Glitch 🕹️
Whether you want to be done in 5 seconds or 5 hours, Glitch is right for you! :) p.s.: try some of the glitch presets out! it's a popular effect, but Advanced Glitch is a bit more complicated, so i wanted to make an easy starting point~
Simple Glitch
This is essentially a plug-and-play glitch effect like you'd see in a lot of horror games - RGB shifting, jumping screen, and blocky colours. It's a good starting point for a simple glitch effect.
- Speed: How fast the glitch effects should refresh (ex. how fast a new part of the screen glitches). As of now, the default value is
30000. A lower value (such as10000) will be much faster while a higher value (such as100000) will be much slower. - Shift: This moves the screen around in small chunks. Please see below for "Shift Power", "Shift Size," and "Shift Amount."
- Chromatic: Similar to shift, but rather than moving the screen itself, it moves individual colour channels of the screen in opposite directions. Please see below for "Chromatic Power," "Chromatic Size," and "Chromatic Amount."
- Blocky: Adds random, colourful blocks on top of the image to represent missing data. Please see below for "Blocky Power," "Blocky Size," and "Blocky Amount."
- Settings used in each section:
- Power: How much of the effect is present. Naturally, a lower value will have less of the effect and a higher value will have more of the effect.
- Size: How large the effect is. For instance, a smaller
Shiftwill move the screen in tinier chunks while a largerShiftwill move the screen in larger chunks. - Amount: How much of the screen is covered by the effect at any given moment.
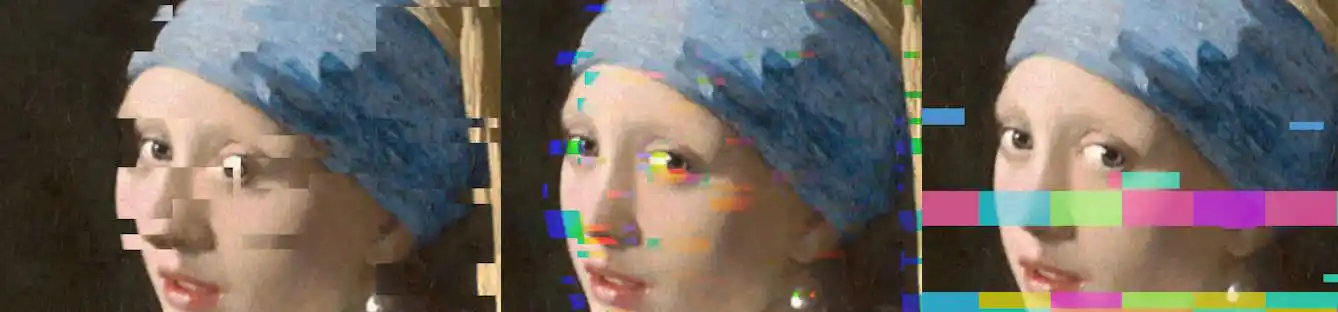 From left to right, there is a (1) Shift effect, (2) Chromatic effect, and (3) Blocky effect. These can be mixed and matched together!
Advanced Glitch
This glitch functions similarly to the Simple Glitch, but you have more control over every step and access to additional effects (such as inverting, pixelating, posterization, and more). There are four steps to the Advanced Glitch: Glitched Areas, UVs, RGB, and Colours.
- Glitched Areas: This controls where on the screen actually gets impacted by your glitch. Keep in mind, these are random and will change based on your speed! These areas will be applied to the other three sections of
Advanced Glitch.tipThink of this as creating a "mask" for the other effects to apply to. This is where the glitch is, since naturally, you don't want the entire screen to be glitched!
- Block: Apply your glitch effects in a blocky pattern around the screen.
- Stripes: Apply your glitch effects in either a horizontal or vertical stripe pattern.
- Line: A combination of the prior two where you can build your own shape to apply the glitch effects.
- Settings used in each section in
Glitched Areas:- Speed: How often the placement of the shapes updated.
- Size: How large (or small) the shapes are.
- Depth: Controls how many different "layers" of your shape apply (for example, a high depth of blocks will have more variation in shape than a low depth where all blocks will be similar in shape).
- UVs: These are the effects that change the position (or shape) of pixels on the screen.
- Warp: Pull the screen to the side (like a scanline).
- Push: A subsection of warp, simply pushing the screen in a direction (like
ShiftinSimple Glitch).Xpushes the screen horizontally andYpushes the screen vertically. - Pixelation: Make part of the screen lower resolution.
- RGB: These are the effects that apply directly to the colour channels of the screen.
- Seed, Chance, and Power: These are applied to all of the options inside of the
RGBtab (rather than each option having individual seeds, chances, and power, likeUVsorColour). - For RGB properties, you will find they are a Vector4 rather than a slider. This is to keep things simple and clean, although it can be a bit confusing! X correlates to Red, Y correlates to Green, Z correlates to Blue, and W is unused.
- RGB Shake: Shakes the colour channels of the screen in glitched areas.
- Speed: How fast the colours shake.
- Power: How much the colours shake.
- RGB Modelo: Shifting, sliding lines of colour offset.
- Style:
X Axisshifts the screen horizontally,Y Axisshifts the screen vertically, andBothshifts the screen in both directions. - Speed: How fast the lines shift.
- Size: How large the lines are.
- Power: How much the lines shift.
- Style:
- Seed, Chance, and Power: These are applied to all of the options inside of the
- Colour: These are the effects that modify the colour of the screen (all at once, unlike
RGB).- Invert: Inverts the colours of the screen (1.0 - colours).
- BW: Makes the screen greyscale.
- Colour: Overlay a specific colour or a random colour (similar to
BlockyinSimple Glitch). - Posterize: Reduces the number of colours on the screen.
- Artifacts: Add various patterns of video artifacting to the screen. Currently there are:
Gradient Delacing(soft lines repeated in small blocks),Strict Delacing(hard lines repeated in small blocks), Rainbow, and Monitor (RGB-esque lines). - Grain: Adds noise to the screen.
tipTurn up the artifact size by a lot (ex. 10000) to make it look most like actual video artifacting!
- Settings used in each section of Advanced Glitch:
- Seed: The starting point of the effect (this changes the effect's randomisation).
- Chance: How likely the effect is to apply each update.
- Power: How much of the effect is present.
If you are getting unwanted pixelation when using UVs, set the Pixelation Power to 100 to completely disable it!